유틸리티 객체와 날짜
*BasicController.java
|
1
2
3
4
5
6
7
8
9
10
11
12
13
14
15
16
17
18
19
20
21
22
23
24
25
26
27
28
29
30
31
|
package com.koreait.thymeleaf;
import java.time.LocalDateTime;
import java.util.ArrayList;
import java.util.HashMap;
import java.util.List;
import java.util.Map;
import javax.servlet.http.HttpSession;
import org.springframework.stereotype.Controller;
import org.springframework.ui.Model;
import org.springframework.web.bind.annotation.GetMapping;
import org.springframework.web.bind.annotation.RequestMapping;
import com.koreait.thymeleaf.data.User;
@Controller
@RequestMapping("/basic")
public class BasicController {
@GetMapping("/date")
public String date(Model model){
model.addAttribute("localDateTime", LocalDateTime.now());
return "basic/date";
}
}
|
cs |
*date.html
|
1
2
3
4
5
6
7
8
9
10
11
12
13
14
15
16
17
18
19
20
21
22
23
24
25
26
27
28
29
30
31
32
33
34
|
<!DOCTYPE html>
<head>
<meta charset="UTF-8">
<title>Insert title here</title>
</head>
<body>
<h1>LocalDateTime</h1>
<ul>
<li>default = <span th:text="${localDateTime}"></span></li>
<li>yyyy-MM-dd HH:mm:ss =
<span th:text="${#temporals.format(localDateTime,'yyyy-mm-dd hh:mm:ss')}"></span>
</li>
<li>@{#temporals.day(localDateTime)} =
<span th:text="${#temporals.day(localDateTime)}"></span>
</li>
<li>${#temporals.month(localDateTime)} =
<span th:text="${#temporals.month(localDateTime)}"></span>
</li>
<li>${#temporals.monthName(localDateTime)} =
<span th:text="${#temporals.monthName(localDateTime)}"></span>
</li>
<li>${#temporals.hour(localDateTime)} =
<span th:text="${#temporals.hour(localDateTime)}"></span>
</li>
<li>${#temporals.minute(localDateTime)} =
<span th:text="${#temporals.minute(localDateTime)}"></span>
</li>
<li>${#temporals.second(localDateTime)} =
<span th:text="${#temporals.second(localDateTime)}"></span>
</li>
</ul>
</body>
</html>
|
cs |
point1. 날짜 출력 기능 종류
- #temporals : 날짜 서식 지원
- #dates : java.util.Data 서식 지원
- #calendars : java.util.Calendar 서식 지원
point2. 세부적인 날짜 출력방법
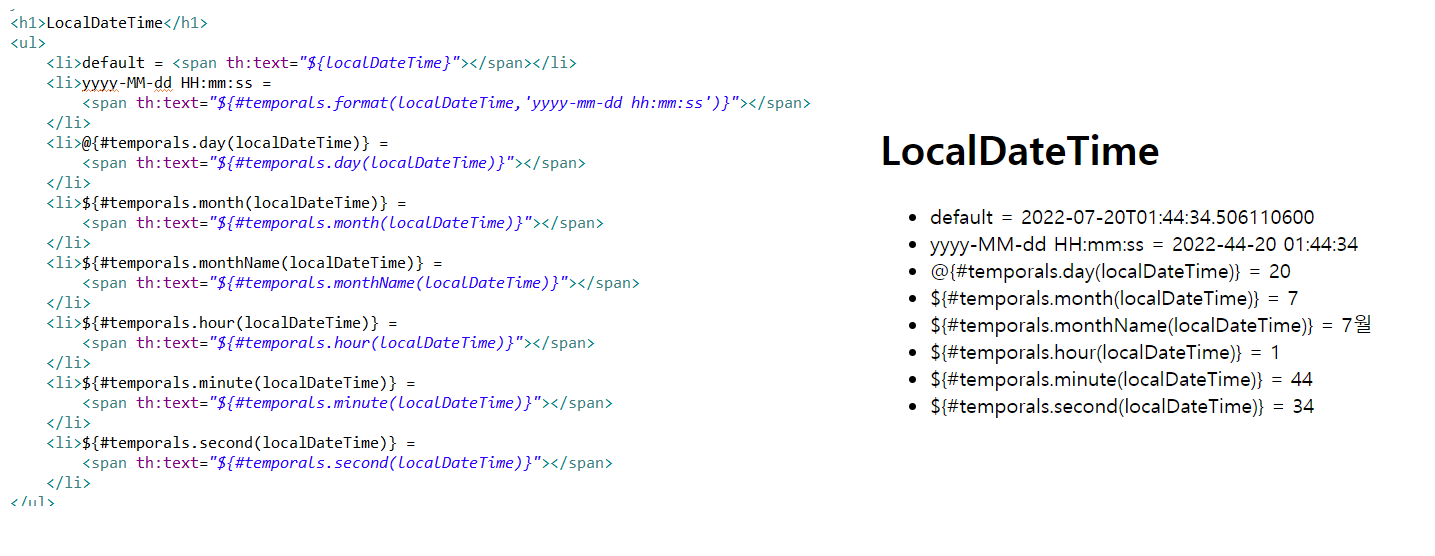
localDate라는 java의 기능을 활용하여 thymleaf를 사용해 각 날짜를 출력하였다.
URL링크로 파라미터넘기기
*link.html
|
1
2
3
4
5
6
7
8
9
10
11
12
13
14
15
16
17
18
19
20
21
|
<!DOCTYPE html>
<head>
<meta charset="UTF-8">
<title>Insert title here</title>
</head>
<body>
<h1>URL링크</h1>
<ul>
<li>
<a th:href="@{/hello}">basic url</a>
</li>
<li>
<a th:href="@{/hello(username=${param1}, userage=${param2})}">query param</a>
</li>
<li>
<a th:href="@{/hello/{param1}/{param2}(param1=${param1},param2=${param2})}">path value</a>
</li>
</ul>
</body>
</html>
|
cs |
*BasicController.java
|
1
2
3
4
5
6
7
8
9
10
11
12
13
14
15
16
17
18
19
20
21
22
23
24
25
26
27
28
29
30
31
32
|
package com.koreait.thymeleaf;
import java.time.LocalDateTime;
import java.util.ArrayList;
import java.util.HashMap;
import java.util.List;
import java.util.Map;
import javax.servlet.http.HttpSession;
import org.springframework.stereotype.Controller;
import org.springframework.ui.Model;
import org.springframework.web.bind.annotation.GetMapping;
import org.springframework.web.bind.annotation.RequestMapping;
import com.koreait.thymeleaf.data.User;
@Controller
@RequestMapping("/basic")
public class BasicController {
@GetMapping("/link")
public String link(Model model){
model.addAttribute("param1", "김자바");
model.addAttribute("param2", "20");
return "basic/link";
}
}
|
cs |
해당방법은 BasicController에서 받은 param의 값을 url로 넘기는 방법이다.

html로 만들어진 a태그를 누르면 thymleaf에서 설정해준 모양에 맞춰서 파라미터가 넘겨지는 것을 확인할 수 있다.
Literals(리터럴)
*literal.html
|
1
2
3
4
5
6
7
8
9
10
11
12
13
14
15
16
17
|
<!DOCTYPE html>
<head>
<meta charset="UTF-8">
<title>Insert title here</title>
</head>
<body>
<h1>리터럴</h1>
<ul>
<!-- <li>"hello spring" = <span th:text="hello spring"></span></li> -->
<li>'hello spring' = <span th:text="'hello spring'"></span></li>
<li>'hello' + 'spring' = <span th:text="'hello ' + 'spring'"></span>
<li>'hello' + ${data} = <span th:text="'hello ' + ${data}"></span></li>
<li>리터럴 대체 |hello {data}| = <span th:text="|hello ${data}|"></span></li>
</ul>
</body>
</html>
|
cs |
*BasicController.java
|
1
2
3
4
5
6
7
8
9
10
11
12
13
14
15
16
17
18
19
20
21
22
23
24
25
26
27
28
29
30
31
|
package com.koreait.thymeleaf;
import java.time.LocalDateTime;
import java.util.ArrayList;
import java.util.HashMap;
import java.util.List;
import java.util.Map;
import javax.servlet.http.HttpSession;
import org.springframework.stereotype.Controller;
import org.springframework.ui.Model;
import org.springframework.web.bind.annotation.GetMapping;
import org.springframework.web.bind.annotation.RequestMapping;
import com.koreait.thymeleaf.data.User;
@Controller
@RequestMapping("/basic")
public class BasicController {
@GetMapping("/literal")
public String literal(Model model){
model.addAttribute("data","spring");
return "basic/literal";
}
}
|
cs |
소스코드상에서 고정된 값을 말하는 용어이다.
"spring"이라는 문자는 문자 리터럴
10,20 이라는 숫자는 숫자 리터럴이다.
<span th:text="hello">면 오류가 발생하는데 이유는 문자 리터럴은 원칙상 ' '로 감싸야하기 때문에 <span th:text="'hello'">로 반드시 수정해야한다.
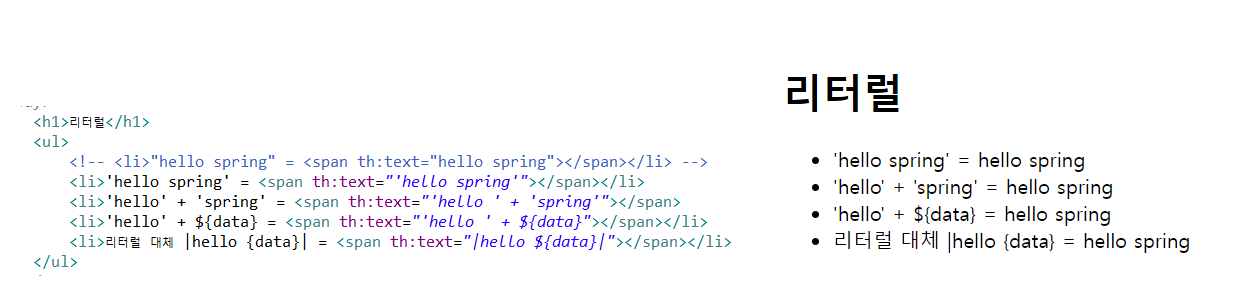
위와 같은 방법으로 리터럴을 출력할 수 있으며 맨 위의 주석은 오류에 대한 예시로 작성하였다.
문자열은 모두 ' '로 매핑되어있으며 마지막 리터럴 대체 |hello ${data}| 구문은 +기호와 ' '를 사용하지않아도 데이터가 연결되어 리터럴보다 손쉽게 데이터를 컨트롤할 수 있다.
연산자
*BasicController.java
|
1
2
3
4
5
6
7
8
9
10
11
12
13
14
15
16
17
18
19
20
21
22
23
24
25
26
27
28
29
30
31
32
|
package com.koreait.thymeleaf;
import java.time.LocalDateTime;
import java.util.ArrayList;
import java.util.HashMap;
import java.util.List;
import java.util.Map;
import javax.servlet.http.HttpSession;
import org.springframework.stereotype.Controller;
import org.springframework.ui.Model;
import org.springframework.web.bind.annotation.GetMapping;
import org.springframework.web.bind.annotation.RequestMapping;
import com.koreait.thymeleaf.data.User;
@Controller
@RequestMapping("/basic")
public class BasicController {
@GetMapping("/operation")
public String operation(Model model){
model.addAttribute("nulldata",null);
model.addAttribute("data","spring");
return "basic/operation";
}
}
|
cs |
*operation.html
|
1
2
3
4
5
6
7
8
9
10
11
12
13
14
15
16
17
18
19
20
21
22
23
24
25
26
27
28
29
30
31
32
33
34
35
36
37
38
39
40
41
42
43
44
45
46
|
<!DOCTYPE html>
<html xmlns:th="http://www.thymeleaf.org">
<head>
<meta charset="UTF-8">
<title>Insert title here</title>
</head>
<body>
<ul>
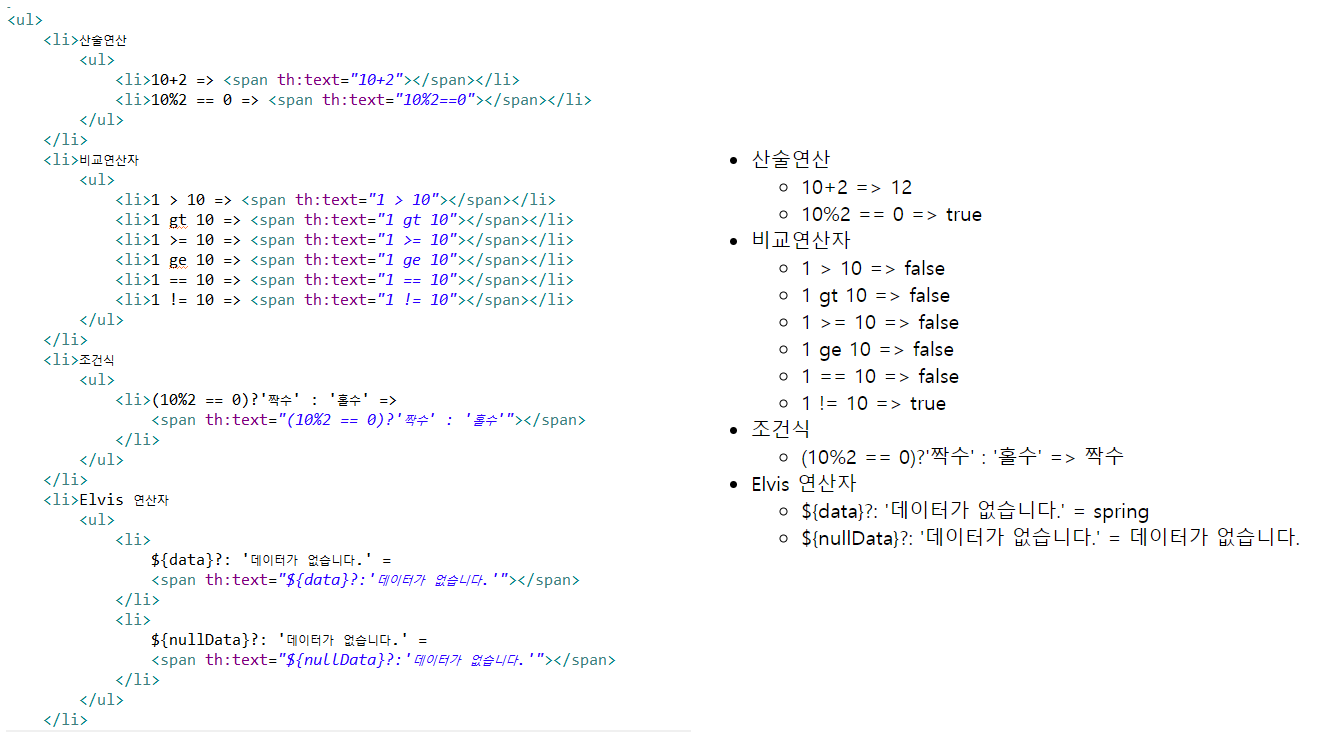
<li>산술연산
<ul>
<li>10+2 => <span th:text="10+2"></span></li>
<li>10%2 == 0 => <span th:text="10%2==0"></span></li>
</ul>
</li>
<li>비교연산자
<ul>
<li>1 > 10 => <span th:text="1 > 10"></span></li>
<li>1 gt 10 => <span th:text="1 gt 10"></span></li>
<li>1 >= 10 => <span th:text="1 >= 10"></span></li>
<li>1 ge 10 => <span th:text="1 ge 10"></span></li>
<li>1 == 10 => <span th:text="1 == 10"></span></li>
<li>1 != 10 => <span th:text="1 != 10"></span></li>
</ul>
</li>
<li>조건식
<ul>
<li>(10%2 == 0)?'짝수' : '홀수' =>
<span th:text="(10%2 == 0)?'짝수' : '홀수'"></span>
</li>
</ul>
</li>
<li>Elvis 연산자
<ul>
<li>
${data}?: '데이터가 없습니다.' =
<span th:text="${data}?:'데이터가 없습니다.'"></span>
</li>
<li>
${nullData}?: '데이터가 없습니다.' =
<span th:text="${nullData}?:'데이터가 없습니다.'"></span>
</li>
</ul>
</li>
</ul>
</body>
</html>
|
cs |
thymleaf로 연산도 가능하다.
Elvis연산자는 조건식의 편의버전이다.
속성값 설정
*BasicController.java
|
1
2
3
4
5
6
7
8
9
10
11
12
13
14
15
16
17
18
19
20
21
22
23
24
25
26
27
28
29
30
|
package com.koreait.thymeleaf;
import java.time.LocalDateTime;
import java.util.ArrayList;
import java.util.HashMap;
import java.util.List;
import java.util.Map;
import javax.servlet.http.HttpSession;
import org.springframework.stereotype.Controller;
import org.springframework.ui.Model;
import org.springframework.web.bind.annotation.GetMapping;
import org.springframework.web.bind.annotation.RequestMapping;
import com.koreait.thymeleaf.data.User;
@Controller
@RequestMapping("/basic")
public class BasicController {
@GetMapping("/attribute")
public String attribute(Model model){
return "basic/attribute";
}
}
|
cs |
*attribute.html
|
1
2
3
4
5
6
7
8
9
10
11
12
13
14
15
16
17
18
19
20
21
22
23
24
25
26
27
|
<!DOCTYPE html>
<html xmlns:th="http://www.thymeleaf.org">
<head>
<meta charset="UTF-8">
<title>Insert title here</title>
</head>
<body>
<h1>속성설정</h1>
<input type="text" name="mock" th:name="userA">
<h1>속성추가</h1>
-th:attrappend =
<input type="text" class="text" th:attrappend="class=' large'"></br>
-th:attrprepend =
<input type="text" class="text" th:attrprepend="class='large'"></br>
-th:classappend =
<input type="text" class="text" th:classappend="large"></br>
<h1>checked처리</h1>
-checked=false
<input type="checkbox" name="active" checked="false"></br>
-checked=O
<input type="checkbox" name="active" th:checked="true"></br>
-checked=X
<input type="checkbox" name="active" th:checked="false"></br>
</body>
</html>
|
cs |
point1. thymelaf의 속성값 설정이란?
HTML태그에 th:* 속성을 지정하는 방식으로 동작한다.
th:*로 속성을 적용하면 기존 속성을 대체하거나 새로 만든다.
즉, thymleaf는 html속성에도 관여할 수 있다.
point2. 속성값 종류 설명
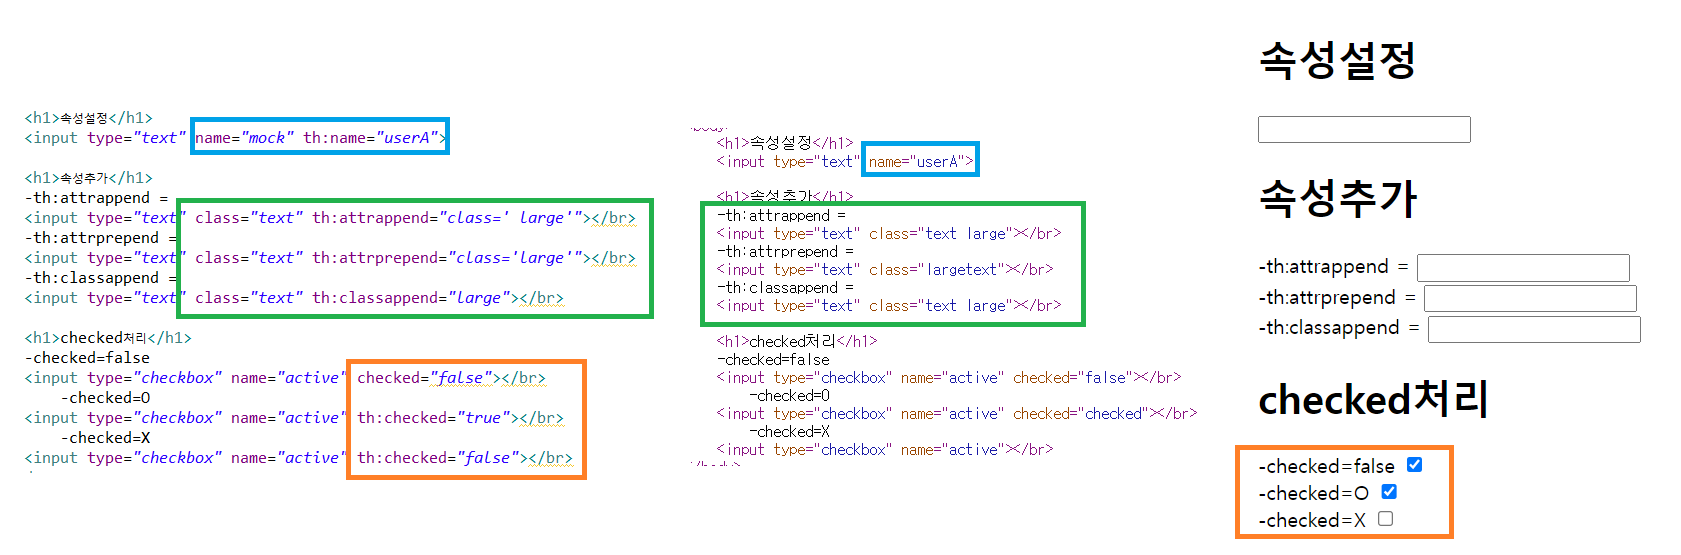
- th:name: 파란박스에서 보이는 것 처럼 thymleaf가 정의한 name값이 그대로 name에 적용된다.
- attrappend: 속성 값의 뒤에 값을 추가한다.
- attrprepend: 속성값의 앞에 값을 추가한다.
- classappend: class속성에 자연스럽게 추가한다.
- checked: html에서는 checked 속성값만 존재하면 체크박스가 주황박스에서 보이는 것 처럼 check가 되어서 처리가 되어버린다. 이를 섬세하게 컨트롤 하고 싶을 때 th:checked를 사용한다.
반복
*BasicController.java
|
1
2
3
4
5
6
7
8
9
10
11
12
13
14
15
16
17
18
19
20
21
22
23
24
25
26
27
28
29
30
31
32
33
34
35
36
37
|
package com.koreait.thymeleaf;
import java.time.LocalDateTime;
import java.util.ArrayList;
import java.util.HashMap;
import java.util.List;
import java.util.Map;
import javax.servlet.http.HttpSession;
import org.springframework.stereotype.Controller;
import org.springframework.ui.Model;
import org.springframework.web.bind.annotation.GetMapping;
import org.springframework.web.bind.annotation.RequestMapping;
import com.koreait.thymeleaf.data.User;
@Controller
@RequestMapping("/basic")
public class BasicController {
@GetMapping("/each")
public String each(Model model){
List<User> list = new ArrayList<>();
list.add(new User("userA", 10));
list.add(new User("userB", 20));
list.add(new User("userC", 30));
model.addAttribute("users", list);
return "basic/each";
}
}
|
cs |
*each.java
|
1
2
3
4
5
6
7
8
9
10
11
12
13
14
15
16
17
18
19
20
21
22
23
24
25
26
27
28
29
30
31
32
33
34
35
36
37
38
39
40
41
42
|
<!DOCTYPE html>
<html xmlns:th="http://www.thymeleaf.org">
<head>
<meta charset="UTF-8">
<title>Insert title here</title>
</head>
<body>
<h1>테이블</h1>
<table border="1">
<tr>
<th>username</th>
<th>age</th>
</tr>
<tr th:each="user : ${users}">
<td th:text="${user.username}">username</td>
<td th:text="${user.age}">userage</td>
</tr>
</table>
<h1>반복상태유지</h1>
<table border="1">
<tr>
<th>count</th>
<th>username</th>
<th>age</th>
<th>etc</th>
</tr>
<tr th:each="user, userStat : ${users}">
<td th:text="${userStat.count}"></td>
<td th:text="${user.username}">username</td>
<td th:text="${user.age}">10</td>
<td>
count = <span th:text="${userStat.count}"></span>
index = <span th:text="${userStat.index}"></span>
size = <span th:text="${userStat.size}"></span>
even? = <span th:text="${userStat.even}"></span>
odd? = <span th:text="${userStat.odd}"></span>
</td>
</tr>
</table>
</body>
</html>
|
cs |
point1. 기본반복문
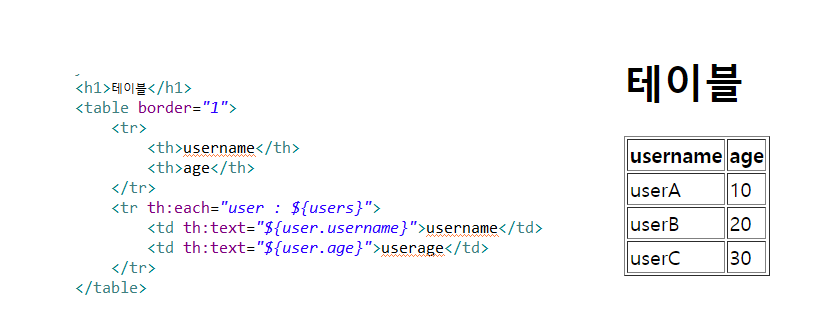
Controller에서 list값이 users에 담겼고 이를 user라는 변수를 선언하여 반복문을 생성하였고 간단하게 list에 있는 값을 출력하였다.
point2. 반복상태유지
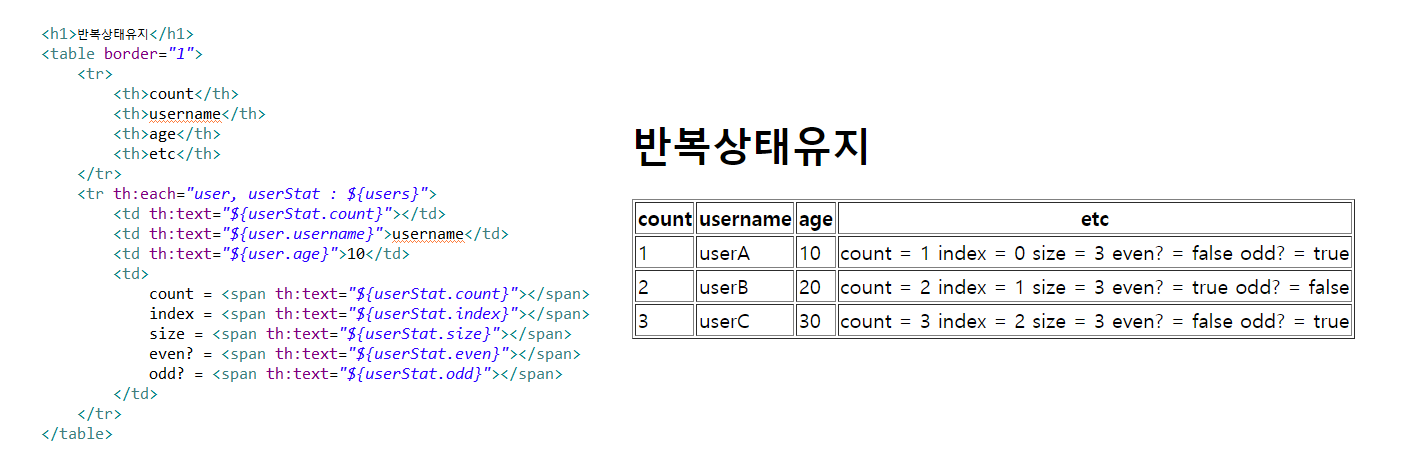
userStat를 사용하여 반복상태가 유지되는 시점에 반복되는 루프에 대한 상태값을 가지고올 수 있다.
- count: 1부터 시작하는 값
- index: 0부터 시작하는 값
- size: 전체 사이즈
- even,odd: 홀수 짝수여부
userState 앞에 user는 반복문으로 꺼내온 값을 담기위해 선언한 변수이다. 그렇기에 지정한 "변수명(user) + State" 는 생략도 가능하다.
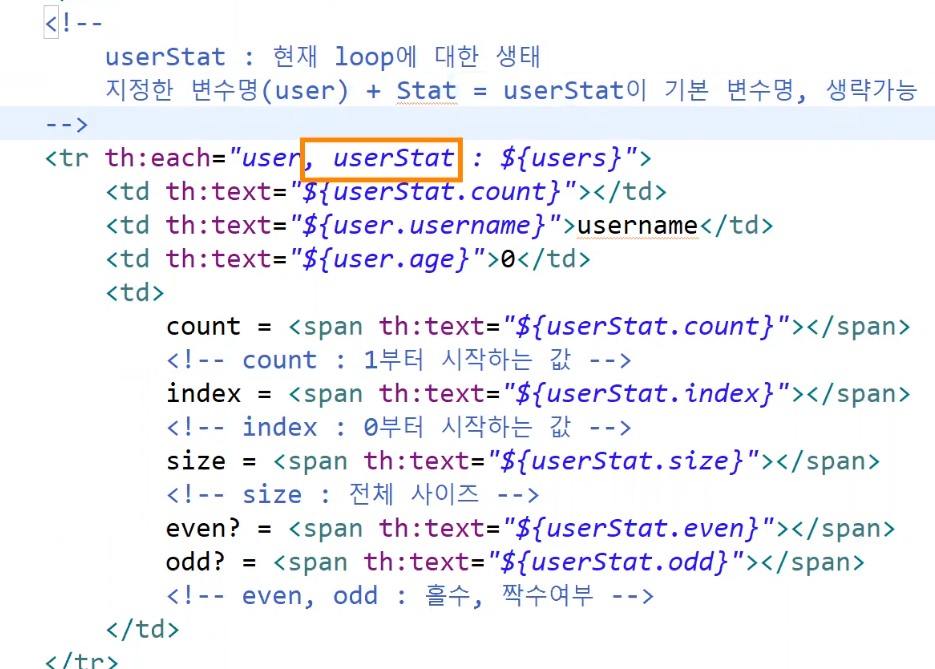
즉, 주황박스가 지워져있어도 결과는 동일하게 출력된다.
point3. BasicController의 최적화
|
1
2
3
4
5
6
7
8
9
10
11
12
13
14
15
16
17
18
19
20
21
22
23
24
25
26
27
28
29
30
31
32
33
34
35
36
37
38
39
40
41
42
43
44
45
46
|
package com.koreait.thymeleaf;
import java.time.LocalDateTime;
import java.util.ArrayList;
import java.util.HashMap;
import java.util.List;
import java.util.Map;
import javax.servlet.http.HttpSession;
import org.springframework.stereotype.Controller;
import org.springframework.ui.Model;
import org.springframework.web.bind.annotation.GetMapping;
import org.springframework.web.bind.annotation.RequestMapping;
import com.koreait.thymeleaf.data.User;
@Controller
@RequestMapping("/basic")
public class BasicController {
@GetMapping("/each")
public String each(Model model){
// List<User> list = new ArrayList<>();
// list.add(new User("userA", 10));
// list.add(new User("userB", 20));
// list.add(new User("userC", 30));
//
// model.addAttribute("users", list);
addUsers(model);
return "basic/each";
}
private void addUsers(Model model) {
List<User> list = new ArrayList<>();
list.add(new User("userA", 10));
list.add(new User("userB", 20));
list.add(new User("userC", 30));
model.addAttribute("users", list);
}
}
|
cs |
만약 지금이 연습문제가 아닌 실무를 하고있었다면 List에 값을 넣고 던져주는 작업은 반드시 어떤 클래스를 생성하여 메서드를 따로 만들어 진행해야한다. 하나의 메서드에는 하나의 역할만 하는 것이 유지보수의 기본이며, BasicController는 여러 클래스들이 거쳐가는 Controller이기에 최대한 간단하게 메서드를 만들고 생성하는 것이 맞다.
조건
*BasicController.java
|
1
2
3
4
5
6
7
8
9
10
11
12
13
14
15
16
17
18
19
20
21
22
23
24
25
26
27
28
29
30
31
32
|
package com.koreait.thymeleaf;
import java.time.LocalDateTime;
import java.util.ArrayList;
import java.util.HashMap;
import java.util.List;
import java.util.Map;
import javax.servlet.http.HttpSession;
import org.springframework.stereotype.Controller;
import org.springframework.ui.Model;
import org.springframework.web.bind.annotation.GetMapping;
import org.springframework.web.bind.annotation.RequestMapping;
import com.koreait.thymeleaf.data.User;
@Controller
@RequestMapping("/basic")
public class BasicController {
@GetMapping("/condition")
public String condition(Model model){
addUsers(model);
return "basic/condition";
}
}
|
cs |
*condition.html
|
1
2
3
4
5
6
7
8
9
10
11
12
13
14
15
16
17
18
19
20
21
22
23
24
25
26
27
28
29
30
31
32
33
34
35
36
37
38
39
40
41
42
43
44
45
|
<!DOCTYPE html>
<html xmlns:th="http://www.thymeleaf.org">
<head>
<meta charset="UTF-8">
<title>Insert title here</title>
</head>
<body>
<h1>if, unless</h1>
<table border="1">
<tr>
<th>count</th>
<th>username</th>
<th>age</th>
</tr>
<tr th:each="user, userStat : ${users}">
<td th:text="${userStat.count}">1</td>
<td th:text="${user.username}">username</td>
<td>
<span th:text="${user.age}">0</span>
<span th:text="'미성년자'" th:if="${user.age < 20}">0</span>
<span th:text="'미성년자'" th:unless="${user.age >= 20}">0</span>
</td>
</tr>
</table>
<h1>switch</h1>
<table border="1">
<tr>
<th>count</th>
<th>username</th>
<th>age</th>
</tr>
<tr th:each="user, userStat : ${users}">
<td th:text="${userStat.count}">1</td>
<td th:text="${user.username}">username</td>
<td th:switch="${user.age}">
<span th:case="10">10살</span>
<span th:case="20">20살</span>
<span th:case="*">기타</span>
</td>
</tr>
</table>
</body>
</html>
|
cs |
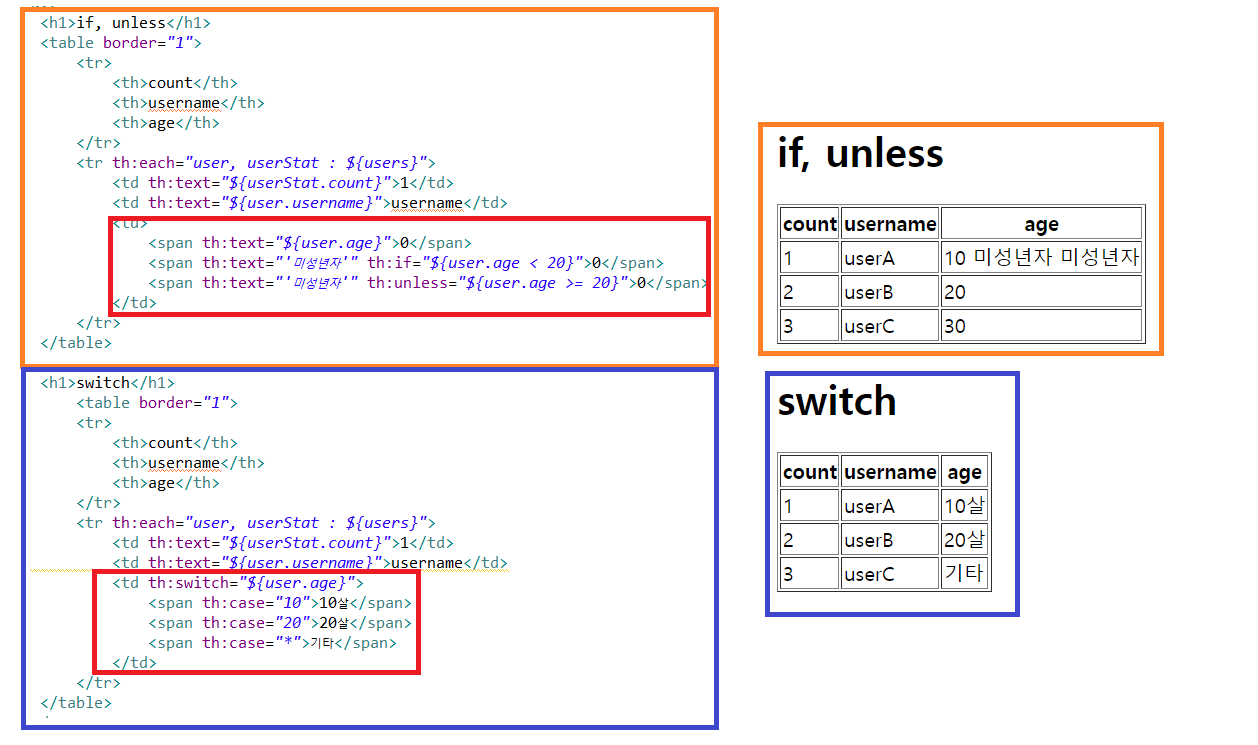
조건문의 종류는 if,unless와 switch로 나누어진다.
주황박스 안의 빨간박스에는 if와 unless로 표현한 thymleaf의 조건문이, 파란박스의 빨간박스에는 switch로 표현한 thymleaf의 조건문이 입력되어있다.
- th:if="${변수명.파라미터명 + 조건식}" -> 조건에 부합하는 결과만 출력하여라
- th:unless="${변수명.파라미터명 + 조건식}" ->조건에 부합하지 않는 결과만 출력하여라
- <th:case="조건">결과<조건> -> 해당 조건에 부합한다면 결과를 출력해라
주석
*comments.html
|
1
2
3
4
5
6
7
8
9
10
11
12
13
14
15
16
17
18
19
20
21
22
23
24
25
26
27
|
<!DOCTYPE html>
<html xmlns:th="http://www.thymeleaf.org">
<head>
<meta charset="UTF-8">
<title>Insert title here</title>
</head>
<body>
<h1>예시</h1>
<span th:text="${data}">html data</span>
<h1>1. 표준 HTML 주석</h1>
<!-- <span th:text="${data}">html data</span> -->
<h1>2. 타임리프 파서 주석</h1>
<!-- 한줄주석 -->
<!--/* [[${data}]] */-->
<!-- 여러줄 주석 -->
<!--/*-->
<span th:text="${data}">html data</span>
<!--*/-->
<h1>3. 타임리프 프로토타입 주석</h1>
<!--/*/ <span th:text="${data}">html data</span> /*/ -->
</body>
</html>
|
cs |
표준 HTML주석으로서 HTML주석 사용가능하지만 타임리프의 자체 주석도 존재한다.
타임리프에서는 타임리프 자체주석을 사용하는 것이 권고된다.
| 표준 HTML 주석 | <!-- 데이터 --> | |
| 타임리프 파서 주석 | 한줄주석 | <!-- /* 데이터 */--> |
| 여러줄 주석 | <!-- /* --> 데이터 <!--*/ --> |
|
| 타임리프 프로토타입 주석 | <!--/*/ 데이터 /*/ --> | |
타임리프 프로토타입 주석은 HTML주석에 약간의 구문을 더하였다.
HTML파일을 웹 브라우저에서 그대로 열어보면 HTML주석이기 때문에 이 부분이 웹 브라우저가 렌더링하지않는다.타임리프 렌더링을 거치면 이 부분이 정상 렌더링 된다.
쉽게 이야기해서 HTML파일을 그대로 열어보면 주석처리가 되지만, 타임리프를 렌더링 한 경우에만 보이는 기능이다.
'국비필기노트 > Spring' 카테고리의 다른 글
| Spring_예제로 보는 Spring (0) | 2022.07.25 |
|---|---|
| spring_thymleaf[3](block, 자바스크립트-inline,fragment) (0) | 2022.07.20 |
| Spring_thymleaf[1](EL표현식, 기본객체&편의객체, Session값담는법, @Component) (0) | 2022.07.20 |
| Spring_thymleaf 자동완성 플러그인 설치방법 (0) | 2022.07.18 |
| Spring_Spring의 http 응답 파라미터 (0) | 2022.07.18 |


